I received a question today from someone who wanted to adjust what prints on paycheck vouchers and pay stubs. Unfortunately you cannot add a bunch of information such as YTD hours worked (which is what he wanted).
However, you can add or remove quite a bit. To adjust select "Preferences" under the "Edit" menu, and choose the "Company Preferences" tab of "Payroll & Employees". Then click "Pay Stub & Voucher Printing".
Below are the options available. The one I recommend highly is the option to only print the last four of the employee SSN. I don't see any real need for the entire SSN to be on the pay stub, unless they are using it to get a mortgage or something and the bank requires it.
Thursday, April 29, 2010
Wednesday, April 28, 2010
Today's Tip - Customize Quickbooks
There are several ways that you can tweek Quickbooks to suit you.
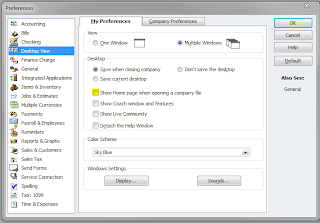
1.) Do you want the "Home" screen to automatically come up when you open Quickbooks? Many like to work from this screen, I have never really adapted to it. To turn it off open Preferences under the Edit menu and select "Desktop View" on the left. Un-check "Show Home page when opening a company file"
2.) Another function I like to use is the "Open Window List". First make sure you are set up for "Multiple Windows" (Check the radio button in the screen shot above). Then select "Open Window List" from the "View" menu. This sidebar allows you to quickly toggle between any screens you have open.
3.) You can also change the order and items that appear in your icon bar to better suit the way you use Quickbooks. Select "Customize Icon Bar..." under the View menu. Here you will be able to move around icons that you use frequently and delete the one you don't.
You may also want to add a new icon. After choosing "Add" on the above screen, you will be able to choose from a wide variety of content as well as icons that you can add to your "Icon Bar".
Federal Unemployment Problem - 501(c)3 Not-for-Profit
Question:
I am the volunteer treasurer for a non-profit (501(c)3) pre-school. I'm using QuickBooks 2008 with payroll.
Everything was going just fine until the other day when an inactive employee was causing a Federal 940 payment to appear in my payroll liabilities. Being non-profit, we aren't subject to this tax and it isn't calculating the tax for the other two active employees.
I went into the Employee Center to edit the inactive employee to ensure the Federal Unemployment Ins. Tax was not checked and it wasn't. I even reactivated the employee and edited the tax info again. Both ways have the check box empty, but the tax keeps showing up. I went into Payroll setup to "uncheck" the Federal 940 as a liability, but there doesn't seem to be a way to turn it off.
Any suggestions to help resolve this are greatly appreciated!!!
Thank you.
Answer:
There are two ways to change the Federal Unemployment (or really any payroll liability), at the employee level and at the company level.
It sounds like you have already made sure that the tax is not applied at the employee level, but for everyone else:
To change the way payroll liabilities apply to your employees, open the Employee Center, and on the Employee tab right click on the employee you want to modify and select Edit Employee. Choose "Payroll and Compensation Info" from the drop down list and click the "Taxes" button. Here you can select the taxes that the employee is subject to. (The screen shot is from a sample file in Quickbooks so the employee "Duncan Fisher" IS subject to FUI, and the box IS checked.)
What about payroll taxes at the company level. These have to be modified one at a time, so lets look at Federal Unemployment as an example:
Click on lists and select "Payroll Item List" right-click on Federal Unemployment and select "Edit Payroll Item". You will notice that there is a box that allows you to make it "inactive". If you were starting fresh and are not subject to the tax I would probably select that box to keep anything from using that payroll item.
However you have already had things pop up, so select "Next" on the above screen three times and you will get a screen labeled "Taxable compensation". It is here that you select what classes of income would be subject to the tax. If I had to guess (which is precisely what I am doing) you have this liability for one employee and not the rest because that employee has a class of income (ie. vacation pay, sick pay, etc.) that the other employees do not, and that class of income is checked to be taxable for Federal Unemployment in QuickBooks.
Hope that is your problem. I hate it when things mysteriously happen, and then you have to search for hours for one nuance in the set-up that is causing the problem.
One suggestion I have to those thinking about using QuickBooks, or just bought it and feel hopelessly lost, is to consider having a professional set up your file to start with. It is not all that expensive, and you may find it saves money in the long run.
Tuesday, April 27, 2010
QuickBooks Finance Charge Calculation
Question:
I am doing statements and the finance charge in Quickbooks doesn't match what my math says they should be. They seem slightly higher. Does QB go by the actual day or by month. I am going by month.
Please Help!
Answer:
First of all I love the question. You Ma'am are an accountant! How many people would have just let the "computer" do the math. Um, just about everyone. "Trust but verify" as my mother used to say.
So with that in mind: How does Quickbooks calculate the finance charge interest?
Equation Used by the software:
Number of days past due x Balance Due x rate/365
However, you should know that there are some user selected options when calculating finance charges. First, you can choose whether to assess finance charge on top of finance charges or only on the original overdue amount. Second you can calculate the finance charge from either the due date or the invoice/billed date. These changes are made on the Finance Charge Preferences screen, which is found under the "Edit" menu after selecting "Preferences"
Just a note - Remember that the whether finance charges can be assessed and the rate at which they can be applied are a matter for state and local law. Please check with a local attorney or accountant before arbitrarily adding them to invoices.
Today's Tip - Print your Signature on Checks
In years past, I have had several clients ask if QuickBooks allows you to automatically print your signature on checks like all the big companies do. The answer is now yes! With the release of QuickBooks 2010, there is a new feature that allows you to print your signature on paychecks, bill payment checks, liability checks, and standard checks.
If you would like to use this new feature, here are the instructions:
1. Sign a piece of paper. Keep in mind that your signature must fit in a 2 3/4" x 3/4" block. (So don't channel your inner Donald Trump). Then save the file in .bmp, .jpeg, .png, or .tiff. You should also use a 11:3 aspect ratio for the best results.
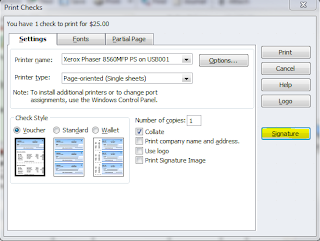
2. Open the "Print Checks" window, as usual. Notice (if you are on the default settings tab) that there is a box labeled signature.
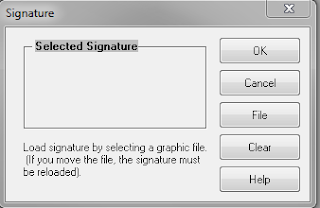
3. When you select "Signature" you will get another dialog box. Choose "File" and select the signature you created in step one. QuickBooks will automatically copy the signature file to the same location as your company file. Once set up the signature will print on all checks until disabled.
OK, is this a good idea? Well, that is the question you need to ask yourself. Some considerations:
Security - Are you sure that no one will use this feature to rob you blind? I once had a client that got taken for six figures over a period of years because they had their signature made into a stamp. If you have multiple users set up in QuickBooks the good news is that the signature file is stored by username and company, so it will not be available to everyone.
Bottom line...If you are printing 500 checks at a time and are beginning to develop carpel tunnel this may be the feature you have been waiting for, if you have one employee an three vendors consider the potential risk before proceeding.
Monday, April 26, 2010
I didn't get paid...Now what?
I have heard over the last few years people have had trouble collecting money (read with the requisite amount of sarcasm).
Question:
How do you write of bad debt in QuickBooks?
Answer:
First make sure the Bad Debt account is set up. Many of my clients didn't know what a bad debt was until last year and therefore did not have an account for it. Next go to "Receive Payments" under the Customer Menu. Select the scofflaw's name in the "Received From" field, and the unpaid invoices will automatically populate.
Leave the payment amount $0.00, highlight one of the invoices then select "Discount & Credits" at the bottom. Enter the amount you are writing off, up to the total amount due on that invoice, and make sure the Bad Debt account is selected and click "Done". The amount written off will now show as a discount in the "Receive Payments" screen. You will notice the sentence fragment in bold above. For some reason QuickBooks requires that you highlight each invoice and go through the discount process with every invoice. It is not possible to post a discount larger than the amount due on the selected invoice. If you do you will get an error message that says "The discount amount cannot be more that the Amt. To Pay." (If I am wrong feel free to tell me, but several people have complained about this because usually if you are writing off one invoice to Bad Debt you will be wring off ALL that customers invoices). You may now choose "Save & Close" to complete.
Note: The process above will NOT change your sales tax liability. That has to be done separately depending on the state and local laws that apply.
Subscribe to:
Comments (Atom)


